
This tutorial covers the basic steps necessary to route events and notifications to Administrators. This step should take place after the Installation steps have been completed successfully. In addition, the post install verifications should be completed as detailed in the MMC Tutorial.
At this point, you need to perform the base configuration
steps which will determine how notifications are routed through the systems. Because
VA2 routes notifications through SMTP servers, you need to contact you system
administrator at this point and determine:
- Address or Hostname of you SMTP server
- User name and password if SMTP Server requires authentication
The steps necessary to set up your communication server have been greatly reduced. Now, you can simply launch the Communication Server Wizard, And it will walk you through the steps of setting up the Communication Server. All you need to know is your SMTP server address. The manual steps are listed below, which may be usefull to refer back to to understand what the wizard is automating for you.
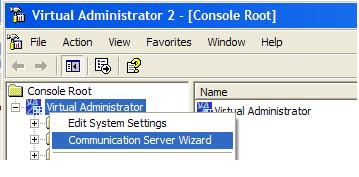
1. Open the VA2 MMC - Right Click on the Virtual Administrator Icon and choose Communication Server Wizard - the wizard will walk you through all required steps.
1. Create a Communication Server
2. Create Administrator(s), and associate them with the Communication Server
3. Create Schedule(s), and associate the Administrator(s) with a Schedule.
Once the communication server is set up, the Notification Rule routing can take place as documented in the Notification Rules documentation.
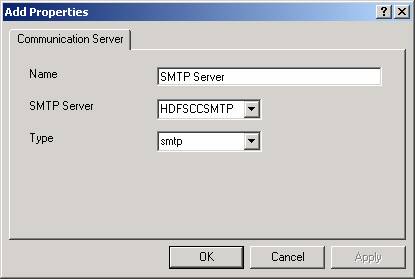
Navigate to the Communication Server folder, right click, and select Add.

You will need to enter a Name (user definable) , the Host, which is you SMTP address and a Type. Currently the only type availble is smtp.
Note that there are multiple SMTP authentication schemes availible. One of the most common is SMTP authentication based on senders email address. A standard MS Exchange server often authenticates in this way. So, if your SMTP server authenticates based on email address, there are no extra steps required, entering the Administrators email address will be sufficient.
Another common SMTP authentication scheme is to require user login. An example of this can be found with Yahoo web mail smtp authentication (which requires premium yahoo service). In that scenario, users have to provide a username and password to the account for authentication. This link gives instructions on how to set up authentication through a variety of email clients. Oddly, VA2 isn't included in the list ;). But VA2 does support login based SMTP authentication. All you need to know is your account name, password, and SMTP address.
If your SMTP server requires Authentication, or uses a SMTP port besides port 25, you can access the Communication Server options to set those parameters. The Communication Server must be created first, as listed below, then right click on it and choose Edit. That will show you the Communication Server Options tab.
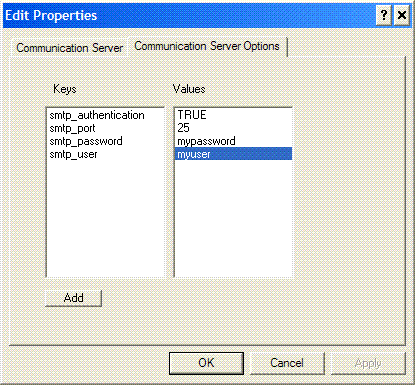
The availible options for the commuication server are:
smtp_authentication [set to TRUE if authentication is necessary]
smtp_port [set to 25 by default]
smtp_user [login name required by smtp server, only used if smtp_authentication = TRUE]
smtp_password [smtp password required by smtp server, only used if smtp_authentication = TRUE]
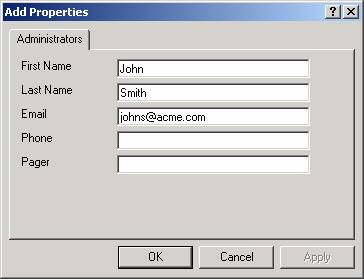
In this step, you will create the Administrator(s) who Receive Notifications. The required paramaters are First Name, Last Name, and email address. The email address must be valid for the smtp server in question.
Navigate to the Administrators folder, right click, and select Add.

When the dialog box opens, enter the First Name, Last Name and email address of the administrator. The other parameters are reserved for future use.
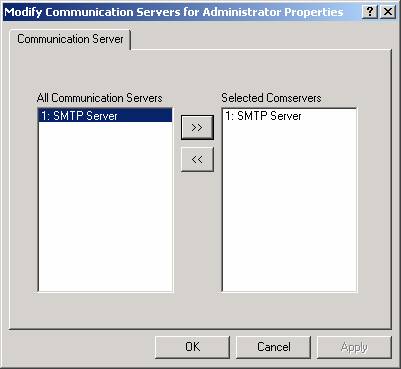
Now that we have added an Administrator, we need to associate a Communication Server to the Administrator so they can receive notifications. To do this, select the newly added Administrator, and select the sub folder – Communication Servers for Administrator. In this folder, right click and choose Add/Remove option.

This will present you a list of Communication Servers that can be added to the Administrator. Choose the Communication server added in step 3, and move it from the All Communication Servers to the Selected Comservers column using the arrows.
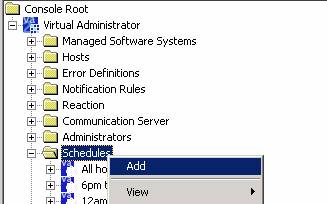
Step 3: Create Schedule(s), and associate the Administrator(s) with a Schedule.
Once Administrator(s) have been created, and assigned to a Communication Server, we need to create a Schedule and associate the Administrators to that Schedule. When Events are routed in VA2 they are sent to an Active Schedule.
To add a schedule, select the Schedules folder, right click and choose Add.
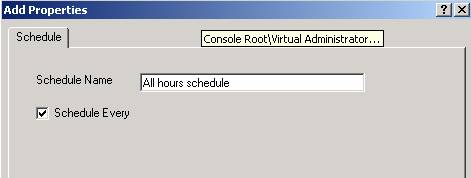
When Adding a Schedule, you can choose several options. You can choose Schedule Every, which means that all events are routed to this schedule, regardless of time. You can also choose days and of the week, and hours per day to route to the schedule.
Remember, if hours of the day are used for the schedule, the 24 hour clock is used. So you can not have a schedule that starts at 18:00 and ends at 06:00 (from 6pm to 6am.). Instead, the schedule must be set from 18:00 to 23:59, and another schedule from 00:00 to 06:00 would be created. In the tutorial we will only create one Schedule, schedule every.
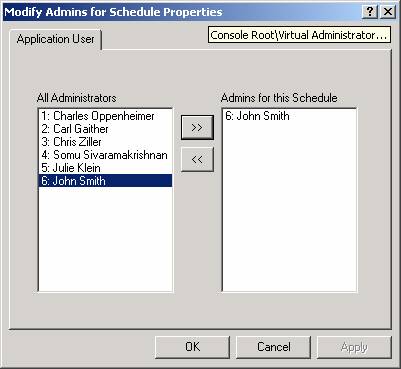
After the schedule is created, we want to add Administrators to the Schedule. This will allow them to receive notifications, as notifications are routed to schedules. Open the Schedule Icon, and right click on the “Administrators for Schedule” folder.
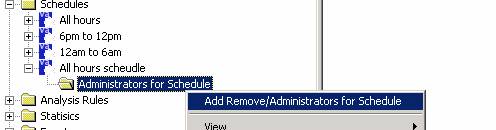
The Add Remove dialog will allow you to associate administrators for the a particular scheudle.
At this point you have completed the steps necessary to define Communication Servers, Administrators, and Schedules for your VA2 Environment. Any Event that satisfies a Notification Rule will be routed to a Schedule, and therefore the associated Administrators.